30 March 2010

Beef Rendang

I love the aromatic spices that fills my kitchen when I make this dish. The weather has started to turn chilly the past couple of days, and whats better than sitting in front of the TV with a warm bowl of spicy coconut beef stew ??

It usually takes me about 3 hours from beginning to end to make this, but it is so worth it. :)

Whenever I do make this now, I try to make a big pot, so that at least it lasts a bit longer. The leftovers always taste better the next day or two.

If I really wanted Beef Rendang right now, then I'll resort to my pressure cooker recipe. But in terms of taste, this recipe from Rasa Malaysia is still ahead by a long way. I don't think I've gone back to my pressure cooker recipe ever since I discovered this one.

My local Asian Butcher doesn't understand what Beef Short Rib is, so I settle for Gravy beef or Chuck Steak instead.
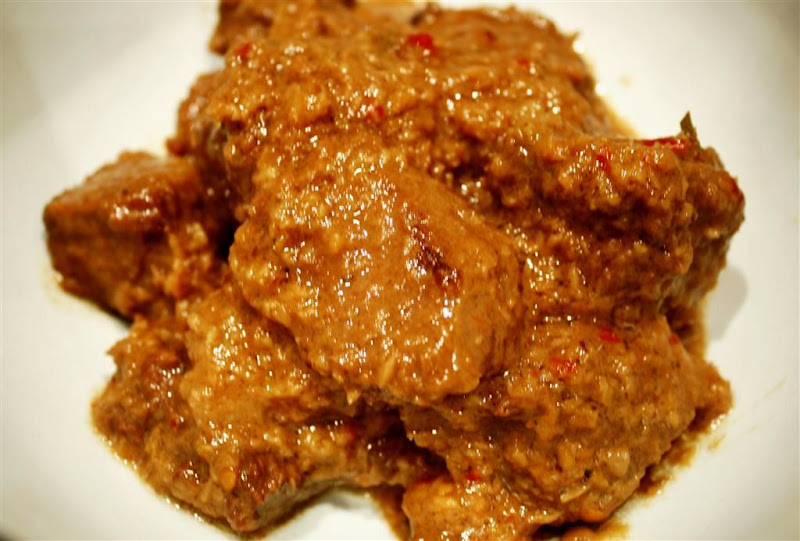


Beef Rendang
Recipe from Rasa Malaysia.com

Ingredients:
  • 1 1/2 pound boneless beef short ribs (cut into cubes)
  • 5 tablespoons cooking oil
  • 1 cinnamon stick (about 2-inch long)
  • 3 cloves
  • 3 star anise
  • 3 cardamom pods
  • 1 lemongrass (cut into 4-inch length and pounded)
  • 1 cup thick coconut milk
  • 1 cup water
  • 2 teaspoons tamarind pulp (soaked in some warm water for the juice and discard the seeds)
  • 6 kaffir lime leaves (very finely sliced)
  • 6 tablespoons kerisik (toasted coconut)
  • 1 tablespoon sugar/palm sugar or to taste
  • Salt to taste
Spice Paste:
  • 5 shallots
  • 1 inch galangal
  • 3 lemongrass (white part only)
  • 5 cloves garlic
  • 1 inch ginger
  • 10-12 dried chilies (soaked in warm water and seeded)
Method:
  • Chop the spice paste ingredients and then blend it in a food processor until fine.
  • Heat the oil in a stew pot, add the spice paste, cinnamon, cloves, star anise, and cardamom and stir-fry them until aromatic.
  • Add the beef and the pounded lemongrass and stir for 1 minute.
  • Add the coconut milk, tamarind juice, water, and simmer on medium heat, stirring frequently until the meat is almost cooked.
  • Add the kaffir lime leaves, kerisik (toasted coconut), sugar/palm sugar, stirring to blend well with the meat.
  • Lower the heat to low, cover the lid, and simmer for 1 – 1 1/2 hours or until the meat is really tender and the gravy has dried up.
  • Add salt to taste. If not sweet enough, add more sugar to taste.
  • Serve immediately with steamed rice and save some for overnight.
Notes:
  • To prepare the kerisik or toasted coconut, just add the grated coconut to a dry wok and stir continuosly until they turn golden brown.
Additional Notes:
  • I found that about 1 hour in (maybe because I have a rather fierce gas stove), the gravy had mostly dried out. I added in probably about 1/2 cup of water and gave it a bit of a stir every 15 mins or so. Until the 1 1/2 hour mark was reached.


28 March 2010

Whole Fish Baked in Chilli Salt

I remember seeing this method deployed by Jamie Oliver on one of his cooking series. At the time, all I could remember was that a vast vast amount of salt was used. With the fish buried in salt, I had wondered how the fish wouldn't come out too salty. I later realised it might have helped if I had asked my local fishmonger to leave the scales on. But if you push away the skin, the underlying meat isn't that salty at all. In fact, the fish meat turned out incredibly tasty and moist.

The chilli plant I was given a while ago, had finally produced enough chillies for harvest, so I was eager to test out the recipe for making some chilli salt (another thing I learnt from Jamie). Baking and hopefully infusing the fish with the chilli from the salt seemed to be a good idea at the time. Although I wasn't sure how much of a chilli kick I would get, so I only used 4 chillies. This gave it a slight hint of a chilli kick, the next time I try this again, I would probably add a couple more.


Whole Fish Baked in Chilli Salt
adapted from Jamie Oliver's cooking show
  • 1 Whole Snapper (about 600g)
  • 2 Bay leaves
  • 3 Sprigs Thyme
  • 3 Egg whites
  • Lemon wedges
  • Olive oil
For the Chilli Salt:
  • 1kg of Coarse Salt
  • 4 Fresh Chilli (I used small chinese chillies).
Making the Chilli Salt:
  1. Working in small batches, use a pestle mortar to grind the fresh chillies and the coarse salt together. The chilli gives the salt a pinkish tint and at the same time infuse the salt with that chilli kick. Using a sieve, pass the grounded salt through to catch the chilli seeds and repeat until all the salt has turned a pinkish colour.


To Bake the Fish:
  1. Preheat oven to 190C.
  2. Place chilli salt and egg whites in a bowl and combine. The mixture should have a consistency like damp sand.
  3. Spread a layer of salt mixture over the base of a oven baking tray. Place fish on top and top with remaining mixture, while sticking in the bay leaves and thyme.
  4. Bake for 30 minutes. Remove fish from oven and cool for about 5 minutes then, using a knife (with the help of a small hammer), break off the salt crust and discard.
  5. Scrape off the fish skin and remove the flesh from the bones. Serve with the lemon wedges and a drizzle of olive oil.

caking the fish with chilli salt.. :)


21 March 2010

Otak Otak (Grilled)

Otak Otak is a parcel of spicy fish coconut custard. Which is sometimes referred to as 'Fish Mousse'. I was introduced to these little babies when my old Uni friends took me to the Bedok night market place in Singapore. Back in Australia, by chance I happened to find Otak Otak being sold at one of the stalls in the South Sydney market. But it wasn't really the same. Sure.. I could go to Malaya (A top notch Malaysian cuisine restaurant in Sydney) and order Otak Otak there. But there's something about paying $15 for two pieces of Otak.. it just doesn't feel right.

So I decided to make my own. :)

That's when I realised there are two versions of Otak Otak. The steamed version which seems to originate from Malaysia - which I found many recipes for online. Then the Grilled Singaporean version - which I found many pictures of online, but no recipes.

So I took the recipe for the steamed version, changed bits and pieces of it according to what I could recall consuming and came up with this.

I changed the fish fillet slices to mince fish paste, since I don't remember there being any individual slice pieces of fish. A lot of recipes recommend getting Spanish Mackerel, but there wasn't any available at my local fishmonger, so I settled for some Red Snapper fillets instead. I also don't recall there being any whole betel leaves in the grilled Otak parcel. Also, being in Australia, I'm not actually sure where you can actually buy these. So I left them out also.

If you like, you could substitute spinach leaves for the betel. I tried this with the first couple parcels, but ended up leaving the leaves out.


Otak Otak
recipe adapted from Nonyafood.com

Ingredients:
  • 1 banana leaf (cut into 12-15 cm wide rectangles and soak in hot water to soften the leaf)
  • 500g fish fillet (minced with a food processor)
  • 20-30 wild betel leaves (daun kaduk) - If you can find any
Spice Paste:
  • 10 shallots
  • 3 cloves garlic
  • 6 fresh red chilies
  • 5 dried red chilies (soaked in water)
  • 2 stalks lemon grass
  • 1 inch galangal
  • 1 inch turmeric
  • 20g shrimp paste (toasted)
  • 2 teaspoons palm sugar (pounded into a soft powder)
Custard ingredients:
  • 2 eggs
  • 1 cup coconut milk
  • 2 teaspoons rice flour
  • 3 kaffir lime leaves (finely sliced)
  • 1 teaspoon salt
Method:
  1. Roughly chop up the spice paste ingredients and then place in a food processor and blend until fine.
  2. Remove spice paste from the food processor and set aside in a large bowl, add fish fillets to the food processor and blend until it has turned into a minced fish paste.
  3. Transfer the fish paste into the spice paste bowl and stir well to combine.
  4. Add in the custard ingredients and mix well.


  1. Cut out the banana leaves into 15cm wide rectangles.
  2. Soften the banana leaves by soaking them in hot water.
  3. Take 1 piece of banana leaf and place 2-3 betel leaves (if using) in the center of a banana leaf. Then add 2-3 tablespoons of the Otak mixture into the middle of the leaf.
  4. Form a bundle by folding one side of the banana leaf over the mixture, and then turning it over once to use the remaining side. Secure the ends with staples or toothpicks.
  5. Heat up a grill pan (I used my cast iron grill pan) over high flames. And grill for about 10 mins, turning every 2-3 mins. If you have a charcoal grill bbq, use that instead.
  6. Serve immediately.


And the finished product...Ta Daa..!

Although I remember these being a bit darker in colour. The taste was very close though. I mean, the taste and fragrance of the spices were all there, but it wasn't totally the same, I think the texture was slightly different. P thinks the difference was because we didn't cook it over a charcoal grill. I think he might be right, as the Otak would have dried out a bit more if we had cooked it over a charcoal grill. And that might help to intensify the flavours and get the texture we wanted.


So with some time still left before the shops started to close (Its Australia..Shops close 5pm on Sundays), we drove to the nearest Barbecues Galore store and bought ourselves a small charcoal barbecue. :)


After getting everything setup and the charcoal beads burning.. We finally made this..


Mission accomplished.. :)


20 March 2010

Coconut Milk & Sago Agar Agar Jelly

Later today, I'll be heading over for a Hot Pot session at S & P's place. Yes... I have mad friends that have Hot Pots on 29C days. Although I'm probably equally as insane as I told them I'll be there too and will bring something for dessert. S's specialty is a Taiwanese Style hot pot that is not only hot in temperature, but also super hot in Chilli spice levels. So hot that your mouth actually goes numb. I'm not sure what she uses, as it is apparently a family recipe. All I know is that she starts cooking the soup base from scratch the night before.

As I promised to bring something for dessert, all I could think of was something that was a bit more cooling. I also wanted to make something that would be able to use up the remainders of an open carton of coconut milk I had leftover from the Otak Otak. I was thinking of Coconut milk and Sago, but since I had to transport it to my friend's place, I preferred something that wasn't in a liquid form. After a quick search online, I stumbled upon this recipe at My Kitchen Snippets. And decided to go with something similar.

I didn't have any food colouring, so used a couple of drops of Pandan essence instead.


Coconut Milk & Sago Agar Agar Jelly
Recipe adapted from My Kitchen Snippets

Transparent Layer:
  • 1 tablespoon Agar Agar powder
  • 600ml water
  • 1/4 cup white sugar
  • 1 Pandan Leaf (tied into a knot, or a couple drops of Pandan essence)
Coconut Milk Layer:
  • 1 tablespoon Agar Agar powder
  • 500ml thin coconut milk
  • 100ml water
  • 1 Pandan Leaf (tied into a knot, or a couple drops of Pandan essence)
  • 1/4 cup white sugar
For the Sago:
  • 2/3 cup Sago pearls
  • 3 cups of water
Method:
  1. In a saucepan, bring the 3 cups of water to boil. Add in the sago pearls and boil uncovered for about 10 mins. After 10 mins, cover the saucepan with a lid and turn off the heat and let sit for another 10-15 mins, until the sago has gone transparent. Pour the contents out into a sieve and rinse under cold water. Divide sago into 2 portions.
  2. Make the Coconut layer by boiling together the agar-agar powder with water, pandan leaves or essence. Make sure there are no lumps before adding in the sugar and coconut milk. Bring to boil and then turn the heat back down to a very low flame.
  3. Make the Transparent layer by boiling together the agar agar powder, water, sugar and pandan leaves or essence. Once the mixture has reach the boiling point, turn the heat down to the lowest setting.
  4. Add one portion of the sago into each of the mixtures and stir well.
  5. Pour in 1/2 of the transparent layer (make there is sago) in to a 8" wet baking dish or mold. Place the dish in to the fridge for about 5 mins to let it set
  6. Remove from the fridge, gently scratch the surface with a fork.
  7. Take another 1/2 of the coconut mixture and pour on top of the transparent layer, return to the fridge for another 4 mins to let it set.
  8. Continue the same process, gently scratching the surface with a fork before pouring on the remaining transparent layer and repeat the process with the remaining coconut layer.
  9. Chill in the fridge for a couple of hours before slicing. Serve cold.

Taste Test: Leftover bits of the Transparent layer that was just enough for 1 cupcake mold.

Notes:
  • Agar Agar powder and strips are commonly found in Asian grocery stores. You can substitute with Gelatine instead and follow the instructions on the back of the packet.
  • To help unmold the jelly, place it on top of a hot towel for about 30 secs then tip it upside down onto a plate.


18 March 2010

Momofuku Milk Bar's Crack Pie

When I saw the post on Almost Bourdain.. I thought.....Oooh.... Must. Make. Pie... Crack Piiieeeee... :)

So I went out to get the necessary ingredients for the Pie, and was all set to make Crack Pie the next day after work. But then work and other annoying things caught up with me, and I never did end up making it that Thursday night.

Now that I have another week before I have to go in to get my two bottom wisdom teeth surgically removed. I thought... if I don't make it now, it would be a while before I'll be able to eat anything like this again. And after the pitiful week I've had at work.. I needed some pie.

Oh.. and for my colleagues at work, who I know follows this blog.. The final straw in my Murphy's Law plagued week. The Sparky plugged a new 3-phase rack (with kit) into configuration that had it drawing 415V instead of 240V. Lets just say there was a slight burning smell in the air. I guess I should be glad it didn't trip the Inergen gas sensors.

Ok. Enough venting about work. Back to the recipe.

I found there was quite a bit of melted butter oozing from my pie during the cooking process. So the next time I make this, I might try to reduce the butter requirements. I've tasted this when it first came out of the oven, cooled to room temperature, and cold from the fridge. I think I prefer it best when it was at room temperature, served with some plain vanilla ice cream on the side.

Oh.. and did it live up to all the hype ? My flatmates certainly thought it did. I think I was on a bit of a sugar-high after the first spoonful. Its sweet, gooey and yet incredibly satisfying. There is something about it that makes me want to eat spoon after spoon, even though its a bit too much on the sweet-end by my usual standards.

I was actually very impressed with the crust. So tasty, yet so quick and easy to make, I think it would work well as a base for my other tarts and cheese cakes recipes.


Momofuku Milk Bar's - Crack Pie
Recipe from Momofuku's Book - as seen on LA Times and Almost Bourdain

Oatmeal Cookie for Crust

Ingredients:
  • 2/3 cup plus 1 tablespoon flour
  • Scant 1/8 teaspoon baking powder
  • Scant 1/8 teaspoon baking soda
  • 1/4 teaspoon salt
  • 1/2 cup (115g) softened butter
  • 1/3 cup (66g) light brown sugar
  • 3 tablespoons sugar
  • 1 egg
  • Scant 1 cup rolled oats
Directions:
  1. Heat the oven to 190C.
  2. In a medium bowl, sift together the flour, baking powder, baking soda and salt.
  3. Cream the butter, brown sugar and sugar until light and fluffy.
  4. Whisk the egg into the butter mixture until fully incorporated.
  5. Stir in the flour mixture until fully combined. Stir in the oats.
  6. Spread the mixture onto a 9-inch-by-13-inch baking sheet and bake until golden brown and set, about 20 minutes.
  7. Remove from heat and cool to the touch on a rack. Crumble the cooled cookie to use in the crust.
Crust

Ingredients:
  • Crumbled cookie for crust
  • 1/4 cup (55g) butter
  • 1 1/2 tablespoons brown sugar
  • 1/8 teaspoon salt
Directions:
  1. Combine the crumbled cookie, butter, brown sugar and salt in a food processor and pulse until evenly combined and blended (a little of the mixture clumped between your fingers should hold together).
  2. Divide the crust between 2 (10-inch) pie tins. Press the crust into each shell to form a thin, even layer along the bottom and sides of the tins. Set the prepared crusts aside while you prepare the filling.
Filling

Ingredients:
  • 1 1/2 cups sugar
  • 3/4 cup plus a scant 3 tablespoons light brown sugar
  • 1/4 teaspoon salt
  • 1/3 cup plus 1 teaspoon milk powder
  • 1 cup (227g) butter, melted
  • 3/4 cup plus a scant 2 tablespoons heavy cream
  • 1 teaspoon vanilla extract
  • 8 egg yolks
  • 2 prepared crusts
  • Powdered sugar to garnish
Directions:
  1. Heat the oven to 180C.
  2. Whisk together the sugar, brown sugar, salt and milk powder. Whisk in the melted butter, then whisk in the heavy cream and vanilla.
  3. Gently whisk in the egg yolks, being careful not to add too much air.
  4. Divide the filling evenly between the 2 prepared pie shells.
  5. Bake the pies, one at a time, for 15 minutes, then reduce the heat to 160C and bake until the filling is slightly jiggly and golden brown, about 10 minutes. Remove the pies and cool on a rack.
  6. Refrigerate the cooled pies until well chilled. Serve cold, and the filling will be gooey. Dust with powdered sugar before serving.

Not pretty.. but sure is yummy.. :)

17 March 2010

BBQ Pork Ribs

So you might be thinking... Recently I've posted up a recipe for BBQ dry spice rub and a homemade BBQ sauce recipe, so what did I use it on ? Well... All to make this.. BBQ Baby Back Pork Ribs. :)

You could use spare ribs for this recipe instead. For baby back ribs, the cooking time would be about ~1 1/2 hrs (thats for ribs that are tender and easy to pull apart), if you are using spare ribs then it will be about 2hrs. If you like your ribs to be 'falling apart' then add another 30 mins to the cooking time.

The ribs get the most out of the Dry Spice Rub if they are left to marinate in them for about 8-10 hrs, which mean you need to start the night before and just leave it in the fridge. If its a last minute thing, then try to let it marinate for at least 2hrs.

I don't own a Barbecue, so these ribs were cooked in an oven with a grill setting. If you own a barbecue, then bake the ribs in the oven first, then finish them off on top of the barbecue.

BBQ Pork Ribs

Ingredients:
Method:
  1. Preheat oven to 160C.
  2. Prepare the ribs by removing the white membrane underneath the ribs.
  3. If you don't already have some ready, make the BBQ Sauce
  4. Make the BBQ Dry Spice Rub and sprinkle the rub generously on both sides of the pork rib slab. Make sure all the pork is covered in the spice rub. Leave the ribs to rest in the fridge for at least 2 hrs, best if left overnight.
  5. Place pork ribs on a piece of foil and drizzle some olive oil over the ribs.
  6. Wrap the seasoned pork ribs in a foil packet. Make sure all sides are sealed.
  7. Place the wrapped pork on a baking sheet and into the preheated oven. Bake for 1 1/2 hours. (See notes above for baking times).
  8. Remove the pork ribs from the oven, and switch it to the grill setting.
  9. Carefully remove the pork ribs from the foil packet and place on your baking sheet.
  10. Warm up the BBQ sauce and liberally baste the bottom of your cooked pork ribs. Leaving the bottom side facing up
  11. Place your BBQ sauce glazed ribs into the oven and allow it to grill for 5-7 mins or until the BBQ sauce caramelizes.
  12. Flip the ribs over and baste the top of the ribs with the BBQ sauce
  13. Return the ribs to the oven and let the grill caramelize the BBQ sauce for another 5-7 mins
  14. Remove the pork ribs from the oven and allow it to rest before cutting.
  15. Baste the pork ribs with more warm BBQ sauce and serve any remaining as a condiment.
  16. Divide the rack into quarters (about 3-4 ribs a set) and serve warm.


15 March 2010

Daring Cooks Challenge - Risotto with Caramelized Onions & Roquefort Cheese

The 2010 March Daring Cooks challenge was hosted by Eleanor of MelbournefoodGeek and Jess of Jessthebaker. They chose to challenge Daring Cooks to make risotto. The various components of their challenge recipe are based on input from the Australian Masterchef cookbook and the cookbook Moorish by Greg Malouf. The main requirement of the challenge was that we must make our own stock and the risotto base.

The base consisted of wine, rice, oil, stock, cheese and butter. Then we had to choose our own variation of risotto after the base was made. I had some Roquefort blue cheese waiting for me to consume, so decided on a risotto with caramelized onions and Roquefort. I can't remember where I first saw this risotto combination (either through blog surfing or in one of my recipe books). I think I originally came across it when searching for a base recipe for the Caramelized Onion, Mushroom and Blue Cheese sauce to go with my Beef Burgers. The risotto I had in mind, was quite different to that cheese sauce. I haven't been able to locate the original recipe, but I do remember there was the port, red onions and blue cheese in the ingredients list.

Making your own stock made a major different in taste. I used a couple of chicken thigh pieces instead of a whole chook. Originally I was thinking just adding the caramelized onions was going to be a bit dull, but it actually enhance the base flavour of the risotto.

I usually use butter for my base instead of olive oil, but I think the olive oil did work better. At least I don't have to be careful about getting my butter burnt. Thank you Eleanor and Jess for the wonderful challenge! :)


Chicken Stock

Ingredients:
  • 1 large chicken 2-3 pounds about 1 kg
  • chicken bones 2-3 pounds 1 kg
  • 2 onions, roughly diced
  • 1 medium leek - white part only, roughly diced
  • 2 sticks celery, roughly diced
  • 2 cloves garlic, halved
  • 1 cinnamon stick
  • 1 tsp. white peppercorns ( Any type of whole peppercorn will do)
  • 2 bay leaves (fresh or dried, it doesn't matter.)
  • peel of 1/2 lemon
  • 1/4 tsp. allspice
Directions:
  1. Wash the chicken and bones and places in a 5 Litre pot, cover completely with water and bring to a boil
  2. Skim away any scum as it comes to the surface
  3. Add the vegetables and bring back to a boil
  4. Add the rest remaining ingredients and simmer very gently, uncovered for 1.5 hours
  5. Carefully lift out the chicken, set aside. The chicken meat can be removed from the chicken, shredded off and used for other things like soup!
  6. Simmer the stock gently for another hour. At , at the end you should have around 2 Liters
  7. Carefully ladle the liquid into a fine sieve, the less the bones and vegetables are disturbed in this process the clearer the stock will be. 

  8. The stock is now ready for use. Freeze what you don't need for later use.


Risotto Base

Ingredients:
  • 60 ml olive oil
  • 1 small onion (quatered)**
  • 400g rice (Any type of risotto rice will do. I use Arborio but the recipe itself says Vialone Nano. Another to look for is Carnaroli)
  • 60 ml white wine
  • 1 L chicken or vegetable stock , simmering
Directions:
  1. Heat oil in a pan and add onion. Fry for a few minutes to flavour the oil then discard. (We diced ours and left it in as we like onion).
  2. Add the rice and stir for a few minutes to coat each grain of rice with oil and toast slightly.
  3. Add the wine and let it bubble away until evaporated.
  4. Add enough stock to cover the rice by a finger’s width (about an inch or two). Don't actually stick your finger in, it will be hot. Just eye it off.
  5. Cook on medium heat, stirring with a wooden spoon from time to time, until most of the stock has been absorbed.
  6. Repeat Step 5 making sure to leave aside approximately 100 ml. of stock for the final step.. Repeat, save 100ml for the final stage.
  7. Once you are at this point, the base is made. You now get to add your own variation.
** Note: Since I was making a Caramelized Onion Risotto, I diced up my onion into smaller cubes and left them in also.


Risotto with Caramelized Onions and Roquefort Cheese

  • 1 litre chicken broth - See recipe above
  • Risotto Base - See recipe above
  • 4 tablespoons unsalted butter
  • 2 large red onions (thinly sliced)
  • 2 twigs fresh thyme
  • 1 cup ruby port
  • salt and pepper
  • 1/4 cup freshly-grated parmesan cheese
  • 60g Roquefort (or try goat cheese for a non-blue option) - about 1 tablespoon per serving
Method:
  1. In a separate 10-inch pan with a lid, melt 3 tablespoons of the butter over medium heat. Add the red onions and cook for about 5 minutes to soften. Sprinkle with a pinch of salt, cover the pan, and reduce the heat to low.
  2. Continue to cook for 30 minutes, stirring occasionally. Raise the heat to medium-high and add the port. Simmer the onions and let the port reduce until completely dry, about 25 more minutes. Remove pan from the heat and set a side.
  3. While the onions is cooking, in a heavy base pot (I used my dutch oven pot) make the risotto. See risotto base recipe above.
  4. Once you are at the final stage of the base risotto, pour in the last 100ml of stock, then stir in the remaining tablespoon of butter, Parmesan cheese and the caramelized onions.
  5. Cover the pot with the lid, and let the risotto sit and rest for about 5 minutes.
  6. To serve, spoon the risotto into shallow bowls and sprinkle the top with small pieces of Roquefort.


14 March 2010

Homemade Barbecue Sauce

Where possible I've always tried to avoid using pre-made sauces and packet marinades. You know the added preservatives and so on, plus its always a lot more fun and rewarding when you make your own. With the weekend to play with, I wanted to try and make my own BBQ sauce at home. At first when I saw this recipe and noticed that 11 of the 13 ingredients called either came from a bottle, jar, can or packet, I was a bit reluctant to try it out. However, Deb @ smittenkitchen.com vouched for it and the original recipe is from Ina Garten. With credentials like that, how could it not be good ?!

It was actually deliciously good. We ended up having BBQ two days straight. I think I slapped the barbecue sauce on all the reserved meats which I had defrosted from my freezer. Chicken wings, Chicken Thighs and the pork spare ribs.

I did find the taste of cumin a bit overpowering. The next time I make this marinade, I would probably try halving the amount, or try substituting the cumin with all spice or chinese 5 spice powder. I also didn't think I got the onions down to a fine enough texture. The next time I think I would puree them in my food processor first before using. I did also toss in a couple of bay leaves. I religiously include bay leaves in sauces, soups and stews. So this barbecue sauce was no exception. I'm not actually sure if they actually improved anything, so you can exclude them if you prefer to keep to the original recipe.


Ina Garten’s Barbecue Sauce
Adapted from her Food Network show as seen on smittenkitchen.com

This is a tangy, subtly spicy, delicious mutt of a barbecue sauce. On her show, Ina Garten explained that she had at one point tried to develop different sauces to complement different cuisines — from Asian to various South Eastern regions — but only when she mixed them all together in frustration did she find exactly her barbecue sauce nirvana. I couldn’t agree more. I make this all summer, freeze leftovers in one-cup servings, and sob when we run out.

Makes 6 cups
  • 1 1/2 cups chopped yellow onion (1 large onion)
  • 1 tablespoon minced garlic (3 cloves)
  • 1/2 cup vegetable oil
  • 1 cup tomato paste
  • 1 cup cider vinegar
  • 1 cup honey
  • 1/2 cup Worcestershire sauce
  • 1 cup Dijon mustard
  • 1/2 cup soy sauce
  • 1 cup hoisin sauce
  • 2 tablespoons chili powder
  • 1 tablespoon ground cumin
  • 1/2 tablespoon crushed red pepper flakes
  • 2 bay leaves - optional
Method:
  1. In a large saucepan on low heat, saute the onions and garlic with the vegetable oil for 10 to 15 minutes, until the onions are translucent but not browned.
  2. Add the rest of the ingredients. Simmer uncovered on low heat for 30 minutes. Use immediately or store in the fridge.


Notes:
  • Do ahead: This sauce freezes excellently, for months at at time.

13 March 2010

BBQ Dry Spice Rub

This is my dry spice rub I use when I want to make BBQ chicken or pork ribs. Its probably best if the meat was left to marinate in the spice rub overnight in the fridge, so that it gets at least 8-10 hrs of marinating (24hrs max). But if its a last minute thing, then try to keep it in for at least 2 hours.

The spice rub not only adds taste, but it helps to tenderise the meat for cooking by drawing excess moisture out. One reason why the Momofuku pork belly tastes so good, yet only requires a salt and sugar rub.

This recipe can easily be doubled or tripled, just try to keep the ratios the same. I usually make this rub in batches, and keep the excess spice mix in a jam jar to be used the next time.

BBQ Dry Spice Rub
  • 2 tablespoons paprika
  • 2 tablespoons chili powder
  • 1 tablespoon light brown sugar
  • 1 tablespoon rock sea salt
  • 1 tablespoon black peppercorns
  • 1 tablespoon cumin
  • 1/2 tablespoon cayenne pepper
Method:
  1. In a hot pan, lightly toast the cumin and peppercorns.
  2. Ground the cumin, peppercorns and salt in a pestle mortar until its become a fine powdery mix.
  3. Transfer to a bowl, and add in the remaining ingredients
  4. Stir until you have an even mix. Use immediately or store in a container for later use.


11 March 2010

Green Papaya Salad - Som Tum Thai

Green Papaya Salad or Som Tum Thai consists of mainly dried shrimp, peanuts, cherry tomatoes and of course green papaya. Snake beans are also added, but I didn't have any on hand. But the reason why green papaya salad is one of my favourite Thai dishes is the dressing that ties all the ingredients together. Its a combination of smashed garlic and chilli with fish sauce, lime juice and palm sugar. The end result is a salad that tastes equally sweet, sour and spicy....which I find really addictive. :)

Its the palm sugar that makes all the difference. I've tried substituting with white sugar before, but it just didn't taste the same.

I also prefer to pound up the dried shrimp until its light and fluffy. I'm not really a fan of munching on small bits of harden dried shrimp. Also P usually avoids anything that resembles the shape of a prawn, but with the shrimp pounded, its all good. Its not like he doesn't know I'm slipping shrimps into the dish, he is the one pounding it.

This is a salad you can just have on its own, or as an side dish with other red meats or seafood. I like to serve it on top of a whole Snapper or any other white fish that has been pan fried until the skin is crispy. The tanginess and spices from the salad transforms the simple pan fried fish into a totally different dish.

Green Papaya Salad - Som Tum Thai
Recipe adapted from Chez Pim's Green Beans Salad
  • 1 tablespoon Dried Shrimp
  • 1 1/2 Cups Shredded Green Papaya
  • 2 cloves Garlic
  • 1 Thai Bird Chilli
  • 1 tablespoon Roasted Peanuts
  • 8-10 Cherry Tomatoes (about a handful - big ones sliced into halves)
  • 2 tablespoons Palm Sugar
  • Juice of 1 lime
  • 2 tablespoon Fish Sauce
  • 4 Long Beans (Cut into 1/2" Lengths) - Optional

Method:
  1. Slice Green Papaya into fine strips and place into a glass or ceramic bowl
  2. In a mortar, pound and grind the dried shrimps until they turn into fluffy flakes, remove from the mortar and set aside.
  3. Gently mash up the garlic cloves in the mortar, then add the chilli and continue to grind until its turned into a chilli\garlic paste.
  4. Add in the tomatoes and gently press down on them to burst and bruise the cherry tomatoes.
  5. Add in the peanuts and pound them with the pestle until the peanuts are lightly crushed.
  6. Using a spoon, remove the mixture from the mortar and place into the bowl with the green papaya strips
  7. Add the palm sugar into the mortar and grind into a thick paste, remove from the mortar and mix into the bowl of papaya.
  8. To the bowl, add fish sauce and fresh lime juice and continue to stir until the contents are well mixed.
  9. Pour in the reserved shrimp flakes, stir and toss well to combine.
  10. Taste to check the seasonings, add palm sugar, lime juice or fish sauce as needed.


Notes:
  • If you only have blanched peanuts, just lightly toast them in a dry pan prior to using.


09 March 2010

Teriyaki Beef

This dish is super tasty yet incredibly simple and quick to make. For me it's especially great on a weekday when I usually get home from work at dinner time. In the morning before I leave for work, I would marinate the beef cubes in about half the marinade without the honey and leave it in the fridge. I find the beef tends to burn and caramelize a bit too easily while cooking if I marinate it with the honey from the start.

So I use equal amounts of soy, mirin and sake for the marinade (about 1 tablespoon each). For the teriyaki sauce, I use the other tablespoon of soy, mirin and sake mixed together with a tablespoon of honey. Also having a piece of good quality beef fillet with a decent amount of fat running through it makes all the difference. :)

Teriyaki Beef
  • 250g beef fillet (diced into 2cm cubes)
  • Cooking oil
For marinade & teriyaki sauce
  • 2 tablespoons light soy sauce
  • 2 tablespoons mirin
  • 2 tablespoons sake
  • 1 tablespoon honey (try to choose one that has a milder flavour) <-- add later for teriyaki sauce
Method:
  1. Marinate the diced beef in light soy sauce, mirin, sake and sugar. Leave in the fridge overnight or through the day. Let the beef come back to room temperature before cooking.
  2. Heat a large frying pan or wok on medium-high heat. Add about a tablespoon of cooking oil. When hot, add the beef and stir fry quickly to prevent the meat from burning and to cook the pieces evenly. When the beef is about 70 per cent cooked, dish out and set aside.
  3. To make the teriyaki sauce, just add the honey to the reserved marinade of soy, mirin and sake back into the wok. Boil over medium-low heat until the sauce is glossy and thickens slightly. It should take on a caramelized taste but be careful not to let it burn.
  4. Add the beef back to the wok and stir well to coat with the thickened sauce. Let the sauce caramelize a bit more with the beef then remove from the wok onto a serving plate.


08 March 2010

Fresh Tomato Salsa

Beef burgers has kinda become a fortnightly weekend event in our household. We still try to come up with different accompaniments to have with our burgers. We did the blue cheese sauce before. This time I was thinking of something fresh but still with a bit of bite. So instead of just adding a few slices of tomato and onion to the burger as the salad section, we ended up making some fresh tomato salsa to go as a topping to our beef burgers. The salsa really does take the burgers to a totally different dimension.

Fresh Tomato Salsa
  • 4 ripe tomatoes (diced)
  • 1 jalapeño chilli (leave the white ribs and seeds if you want it hotter, otherwise remove them, finely sliced) - Omit if you are not a chilli fan.
  • ½ cup Onion (diced)
  • One garlic clove (finely minced)
  • ¼ cup spring onion (finely sliced)
  • ¼ cup fresh coriander leaves and stems (stems finely sliced, leaves roughly chopped)
  • ½ teaspoon sea salt
  • fresh ground pepper
  • Juice of 1 lime
Method:
  1. Place the diced tomatoes tossed with a pinch of salt into a colander over the sink (or bowl) and let drain for 20~30 minutes.
  2. Discard the juice and transfer tomato to the bowl. Add the rest of the ingredients and stir to combine. For more heat, include both the ribs and seed of the chillies.
  3. Taste and adjust the flavour with lime juice, salt and pepper. If the salsa becomes a bit too acidic, add a little sprinkle of sugar to balance things out.
  4. The fresh salsa should be covered, and placed in refrigerator to rest for 30 minutes. Doing this will allow the ingredients to bind together, creating a more intense and well-incorporated flavour.

Beef burger with a dollop of salsa on a not-so-lightly-buttered-bun.. :)

07 March 2010

Ponzu Sauce

This is the recipe for the Ponzu dipping sauce I used with the Beef Tataki. Ponzu is actually a good accompaniment to other meat or fish dishes and can also be used in salads as a vinaigrette.

Ponzu is a citrus flavored soy sauce that is simple yet adds another dimension to the item you have it with. It should be perfectly balanced in terms of saltiness and tanginess without overpowering the dish it is paired with. Ponzu can be used as an alternative for soy sauce when eating sashimi.

For best results, try to use fresh lemon and limes for the citrus juice. Grapefruits can be used as well.

Ponzu Sauce
  • 2 tablespoons fresh lime and lemon juice (about 1 tablespoon each)
  • 2 tablespoons light soy sauce
  • 1 tablespoon mirin
  • 1 tablespoon unseasoned rice wine vinegar
  • 1 tablespoon bonito granules (dissolved in 2 tablespoons of hot water)
Method:
  1. In a bowl, combine all the ingredients together and cover and let sit in the fridge overnight. Let the ponzu come back to about room temperature before using.


06 March 2010

Beef Tataki with Ponzu Sauce

Every fortnight, a few of my foodie colleagues and myself get together for dinner and try out a restaurant. We actually put a list together on google wave of about 18 different places that finishes with Tetsuya. It's with this group that we also try to do a monthly cookingfest at one of our places. The last time I went, I made the pork belly confit (yes.. that means I had the pork belly confit twice). The theme this time is small dishes that goes with sake. I thought I'll stick with a lighter dish this time round, so went with the beef tataki with ponzu sauce and some tsukune chicken meatballs.

The term tataki refers to meat (usually beef or fish) that has been marinated, seared, then chilled and thinly sliced to serve. This is something we always end up ordering at a Japanese restaurant. So was nice to learn how to make it at home.


Beef Tataki with Ponzu Sauce
  • 300g high quality beef fillet (trimmed of fat)
  • 1/2 cup Japanese light soy sauce
  • 1/4 cup mirin
  • 1 tablespoon unseasoned rice vinegar
Garnish
  • 1 stalk Spring onion (green & white part, finally sliced)
  • 1 teaspoon fresh Ginger (peeled, grated through a microplane grater to remove the fibrous parts)
  • 1 teaspoon fresh Daikon Radish (peeled, finely grated through a microplane grater).
Additional items required:
  • Ice cubes
  • Clingwrap
Method:
  1. In a Pyrex or ceramic bowl, mix soy sauce, mirin and rice vinegar. Place beef fillet in bowl and turn several times to coat all sides of beef in marinade. Cover with plastic wrap and place in refrigerator for 20 minutes, flipping the beef over after 10 minutes.
  2. Remove beef from marinade and pat dry with a clean kitchen towel. Discard marinade.
  3. Prepare a bowl large enough to completely submerge your beef with an ice bath. Fill it 1/2 way with some ice and set aside.
  4. Heat a heavy-duty saucepan over high heat. Add just enough cooking oil, about 1 tablespoon, to keep beef from sticking to the pan.
  5. Place beef in pan and quickly sear each side until lightly browned, about 15-20 seconds.
  6. When all sides have been seared, remove from pan and wrap with some clingwrap before plunging the beef into the ice bath to stop the cooking process. Wrapping the beef in the clingwrap before tossing it into the ice bath means that the meat wont come into contact with the water and therefore wont dilute the taste.
  7. To serve, cut across the grain into the thinnest possible slices possible with a very sharp knife. Lightly tap each piece a few times with the blade of the knife to score, being careful not to cut all the way through.
  8. Fan the slices, overlapping, on a platter and let stand for 10 minutes. Drizzle with the Ponzu sauce and serve. Garish with some finely sliced spring onions and some grated ginger and daikon radish on the side.

my tower of beef tataki.. :)
Notes:
  • If you're not confident about getting really thin slices with the beef, about 45 minutes before you plan to serve, place the clingwrapped beef in the freezer (this will firm the beef and make it easier to cut even slices).


02 March 2010

Chinese Dried BBQ Pork - Bak Kwa

I did it. I made my own Bak Kwa ~~~~~~ !!! Woot !!

When I saw the recipe on pigpigscorner, I knew I had to try it out. The original recipe calls for the meat to be baked in the oven for 20 mins on low and then 15 mins more on high. I found that with 15 mins on high, my Bak Kwa came out a bit more burnt than I would have liked. So I cut it down to 5 mins on each side.

I also used pork neck and minced the meat myself in my Magimix food processor. You can just use pork mince from the butcher. But ask for one that has a higher content of fat. The fatty parts is what makes the Bak Kwa taste so yummy. :)

Chinese Dried BBQ Pork - Bak Kwa
recipe adapted from pigpigscorner.com

  • 500g of Pork Neck (minced)
Seasoning:
  • 1½ tablespoon Fish Sauce
  • 1 tablespoon kecap manis
  • 1 tablespoon Cheong Chan Thick Dark Soy Sauce (Thick Caramel Sauce) - Optional
  • 1 tablespoon Light Soy Sauce
  • 1 tablespoon chinese rice wine
  • 1 teaspoon chinese 5 spice powder
  • 1 teaspoon oil
  • ½ Cup Sugar
To brush on top of meat:
  • 1 tablespoon Honey mixed with ¼ cup of hot water
Method:

  1. Mince the meat up in a food processor.
  2. In a big bowl, add the seasoning to the minced meat.
  3. Stir the mixture with a pair of Chopsticks in one direction, until minced meat becomes like glue.
  4. Put some of the gluey minced meat on a baking paper. Cover the meat with a big cling wrap or plastic sheet and use a rolling pin to roll the meat to about 2mm thick.
  5. Remove the plastic sheet and put the entire baking paper with the minced meat on a baking tray.
Baking:

  1. Bake in preheated oven at 120C for 20 minutes.
  2. Then increase the temperature to 180C and bake for about 5-7 minutes.
  3. Remove the baking tray from the oven and let the meat cool for about 5 minutes.
  4. Flip the meat over onto a fresh baking paper, brush with some of the honey water and bake for another 5 minutes at 180C.
  5. Cool the bak kwa and cut into pieces (I used a pizza cutter) before storing in air-tight container.


Related Posts with Thumbnails